 |
||||||||||||
 |
||||||||||||
|
||||||||||||
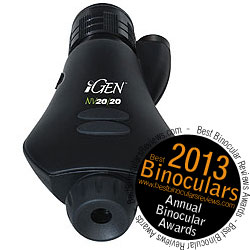
Awards: Best Night Vision Device 2013
Up until now, all the night vision devices that I have used, tested and written reviews about have all used intensifier tubes that take the collected light energy from the objective lens in the form of photons, converts them into electrons, amplifies or multiplies them and then sends them flying onto a phosphor screen that changes them back into visible light.
Sounds complicated and I guess it is, but this is the way most standard night vision devices work, be that an entry level Gen.1 monocular or a very high end Gen.3 night vision binocular.
But there is another way, the Night Owl Optics iGen 20/20 Night Vision Viewer uses a form of digital night vision to amplify the available collected light and display it on a screen which you look at through the eyepiece as you would on any standard night vision monocular.
Digital Night Vision and in particular the iGen technology developed by Night Owl Optics which they call their tubeless night vision technology is said to have a number of advantages, which I will take a look at in detail in this review and see if it is as good as they say it is.
Main Specifications & Highlights
Before we get into the performance and image quality, I first wanted to take a look at the body, it's design and go over what goes where.
There are two models of the iGen 20/20, the NOIGM3X and the NOIGM3X-IC that I tested for this review. This version is able to capture images and store them on a memory card that fits into a slot under the body.
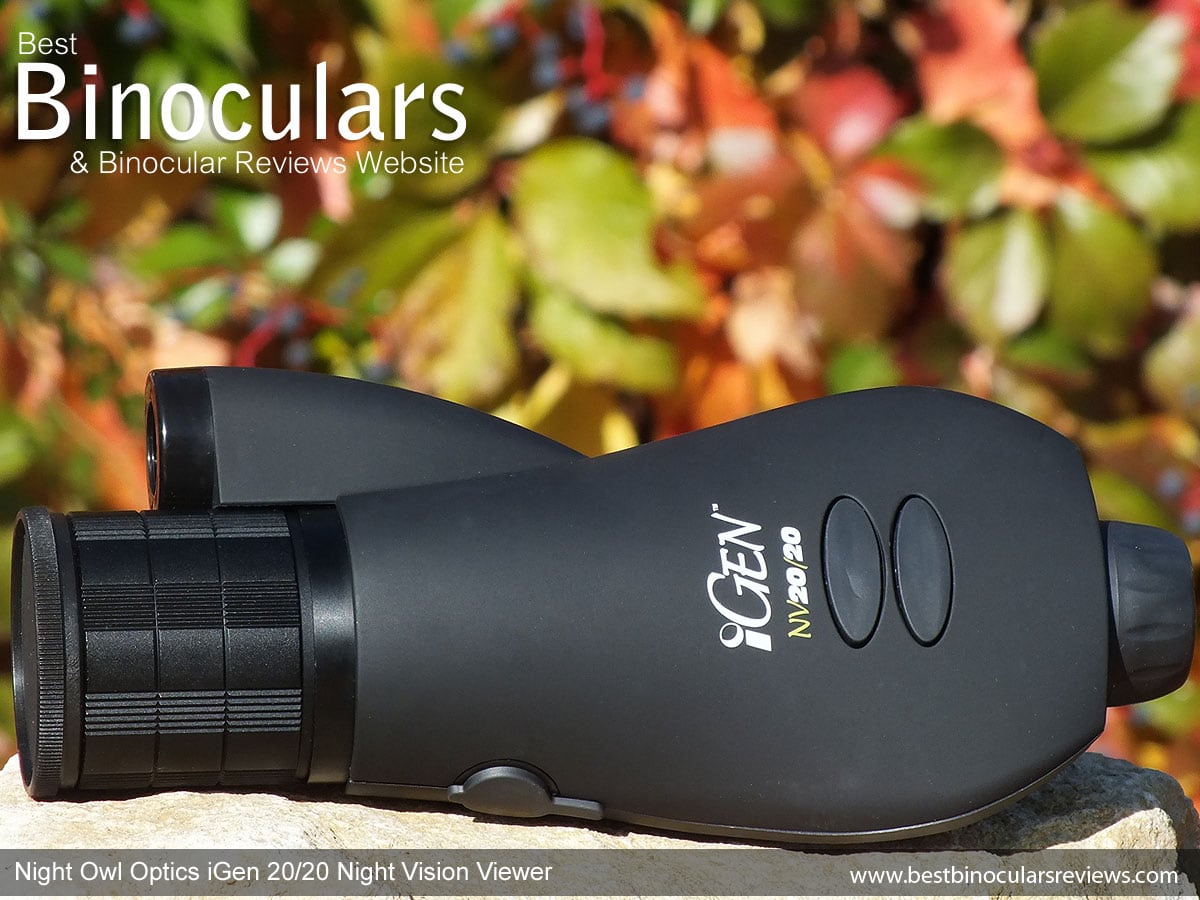
Fig. 1 - Night Owl Optics iGen 20/20 Night Vision Viewer
Design
The iGen Night Vision Viewer is essentially a monocular, but it's styling is quite different to most standard NV monoculars as it has a far flatter profile (it is wider than it is tall). When I first took it out of the box, my initial reaction was to hold it sideways, however once you get the idea of how to hold it, it is really very comfortable and well balanced.
To help with this, under the device and on the battery compartment cover is a large thumb indent that does a good job of encouraging you to hold it correctly with one hand at this point, taking most of the weight. From here you can reach all the buttons including the three-way switch without really having to change grip. Your other hand holds onto the barrel of the objective lens at the front of the iGen to adjust focus and steady the device.
The whilst the shape is quite unique, it really works as you can easily change all the settings and adjust the focus without having to take your eyes away from the eyepiece.
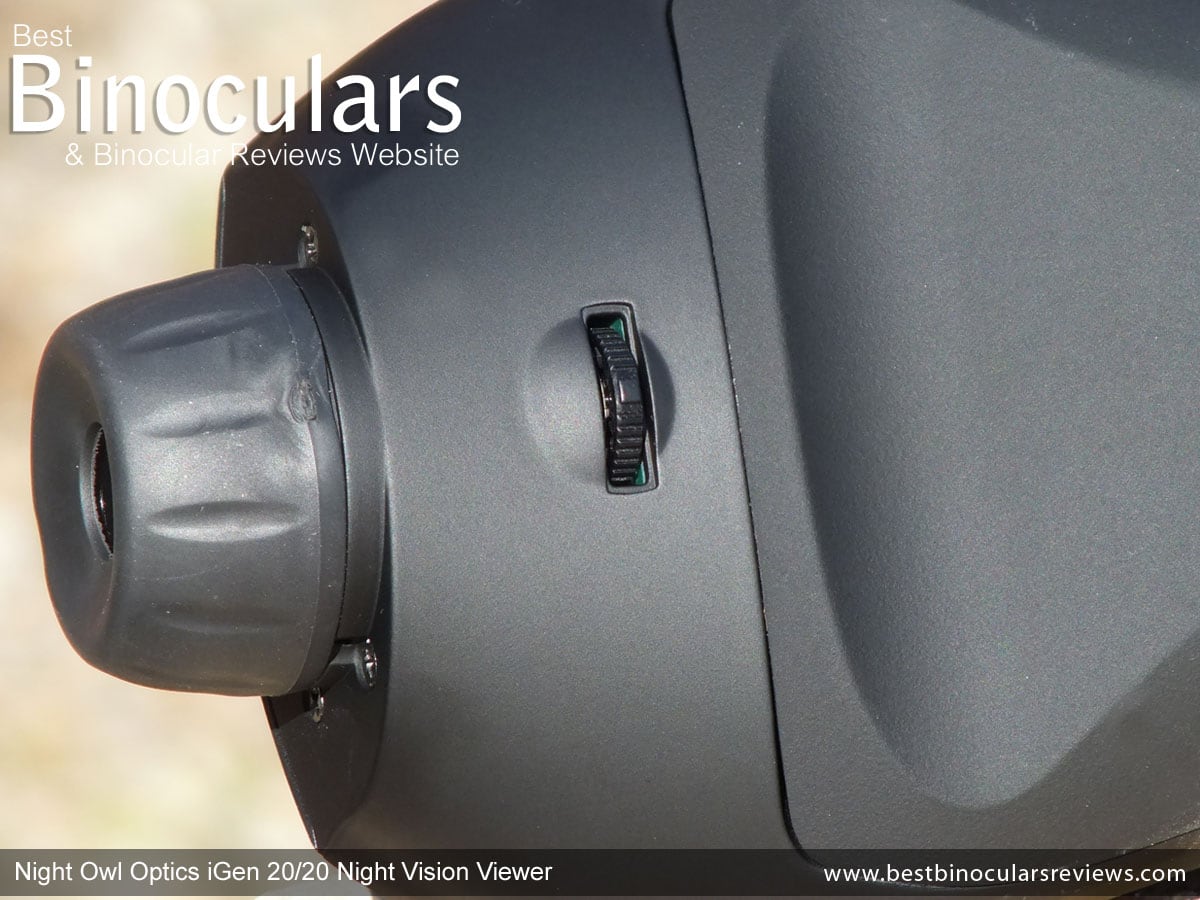
Fig. 2 - The eye piece, three-way switch and thumb indent on battery cover of the iGenIC 20/20 Night Vision Viewer
The main external casing on the chassis seems to be made out of a hard plastic, whilst the focussing section near the objective lens is metal.
The main body is black and apart from the metal objective lens feels quite velvety and has a matte finish to it. This is great as it just helps to ensure that the entire unit is as unreflective as possible, which could be important if you are trying to remain hidden.
Dimensions
The iGen has advertised dimensions of 9.75in x 5in x 3.5in, however this seems to be the dimensions of the packaging as I measured them to be 8.8in (22.5cm) long x 3.9in (10cm) wide x 2.6in (6.5cm) tall, which is still quite a bit larger than comparable standard night vision monoculars.
Weight
This iGen
NOIGM3X-IC model weighs 21oz (595g) without batteries - so it far from being the lightest NV monocular available, but even with batteries, I would not describe it as being excessively heavy.
For comparison below are a few other night vision monoculars that I have reviewed:
Eye Piece
At the rear of the device you find the eyepiece, the actual eyecup has an external diameter of 30mm and a thin rubber covering on it to help with comfort when pressed against your face.
As with many monoculars, the eyecup can be rotated to adjust the diopter setting and so focuses it for your personal eyesight onto the display screen. This is quite a simple procedure, which is covered in the included manual and only needs to be done once when you use the iGen for the first time.
Button Controls
There are just three buttons located on the iGen and I will just quickly go through each to describe it's function:
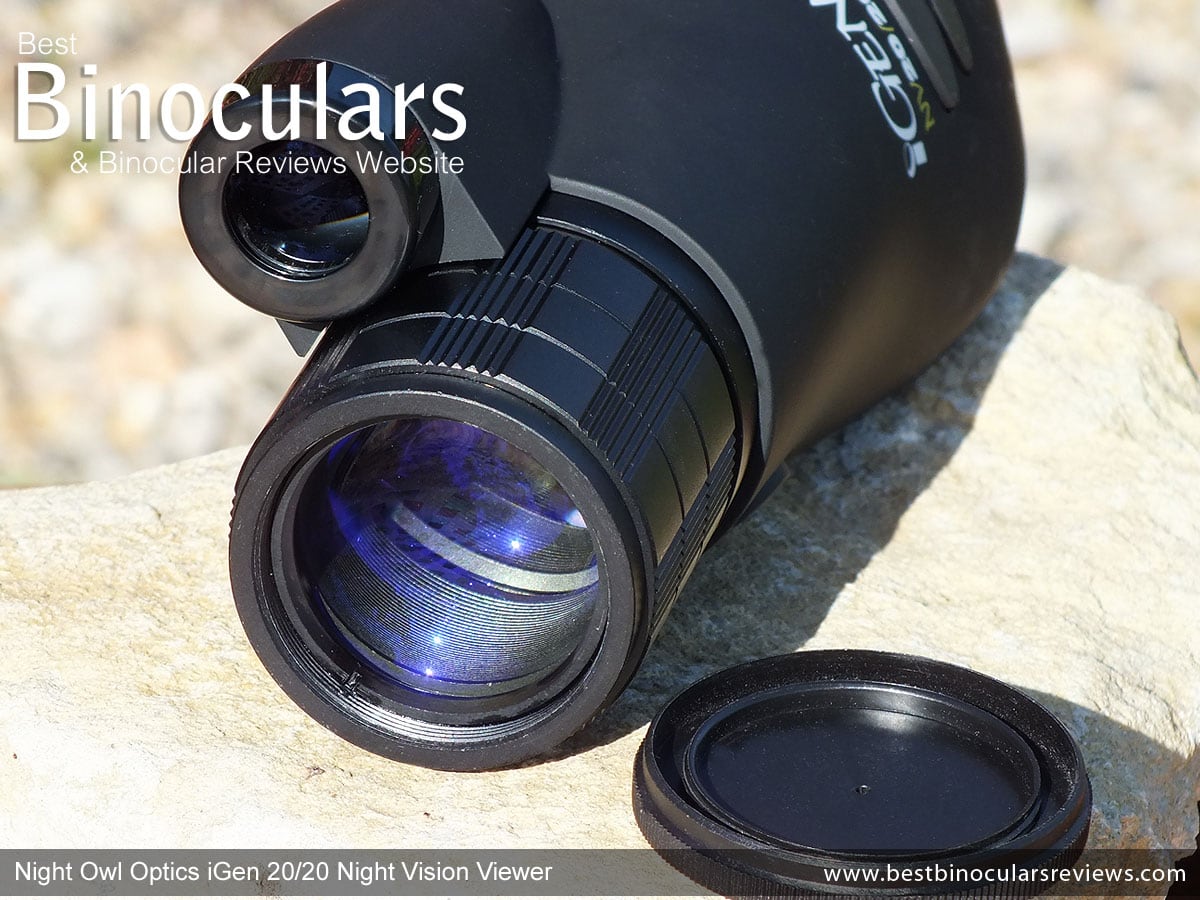
Fig. 3 - The lens on the iGen 20/20 Night Vision Viewer
Objective Lens & Focussing
The lens has a diameter of 39mm and as you can see from the photo above (Fig. 3) the objective lens is located reasonably deeply inside its housing at the end of the barrel (about 6mm), which will help in protecting it when the lens cap has been removed.
The lens housing is made from metal and has a number of grooves and serrations cut into it to help with grip. To focus the device you simply rotate this housing, taking about 270° of rotation (less than 1 full turn) to adjust the focus from near to far focus.
I found that on the model I was using it turned nice and smoothly with enough resistance (if just a bit too much) to ensure that it would not move accidentally.
The fact that it is nice and large and because of the deeply cut grooves in it, adjusting the focus even when wearing thick gloves, was not a problem. This can be very important when using any surveillance equipment in cold conditions in the middle of the night.
Infrared Emitter (IR)
Located right next to the objective lens is what looks like a second smaller lens, this is the infrared illuminator where a very bright infra red light that is invisible to the human eye is emitted from.
Night Owl state that the emitter casts the light out at an angle of 12° from the device, which is the same as the viewing angle of the iGen. This is why when you switch the IR on, the whole image you see lights up and not just a small spot in the center of the field of view, as I have seen on other NV products I have used in the past.
This infra red light is not a laser, it is created using a very small light emitting diode (LED), which are known for their long life and despite their size are able to deliver light at very high power but use a relatively low amount power to produce it.
The IR is designed to be used when there is not enough external light for the iGen to work adequately. So the IR helps by sending out it's own light for the night vision device to then use to "see" what to our eyes is in complete darkness. A good way to think of it, is like a very powerful invisible torch!
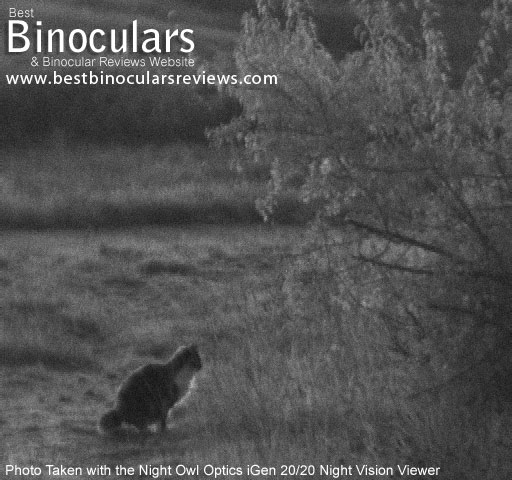
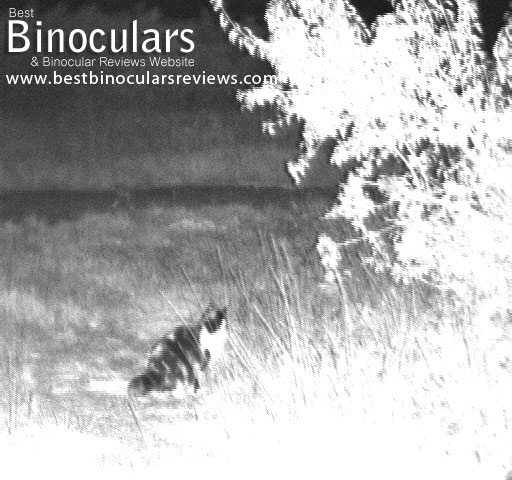
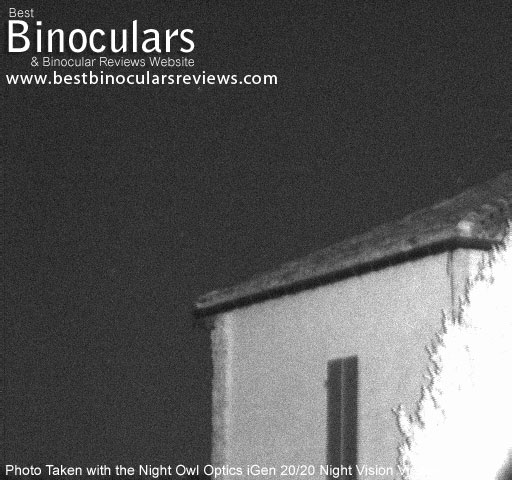
You will see in some of the example photos below that turning on the IR can make a huge difference, especially at short to medium distances.
IR Adjustments
Unlike quite a few other night vision devices that I have used where you can manually adjust the intensity and sometimes the spread the angle of light, the only adjustments that you can make on the iGen to are to toggle the setting between Auto, Max or Off. However in Automatic mode, the device will adjust the intensity so that there is the right amount of infrared light for optimum illumination depending on the circumstances.
Something worth mentioning here is whilst the infrared light may be invisible, the actual diode glows a bright red inside the emitter, which can be seen from a distance, so don't use IR if you want to make 100% sure that you remain hidden. Also, like any bright light, never point it directly at your eyes from close range.

Fig. 4 - The battery compartment & tripod adapter on the iGen 20/20 Night Vision Viewer
Battery Compartment
On the underside of the iGen is a cover that can be removed to expose the batter compartment. The iGen 20/20 Night Vision Viewer takes 4 AA alkaline batteries, which are not included in the box.
According to Night Owl Optics, they should last about 4.5 hours when used continuously. This reduces to 2.3 hours with the IR emitter switched on to maximum brightness.
Using the device in image capture mode also uses more power and can reduce battery life by about 25% if left on all the time.
By reducing the display brightness and programming the iGen to switch off automatically in the menu you can help increase battery life.
Waterproofing
Night Owl don't mention anything about waterproofing and because of the ease of entry to the batter compartment, I am going to assume that the iGen is not waterproof. Having said that, it looks like it should survive a few drops, just make sure you cover it should the weather turn really nasty.
I do also know that Night Owl Optics produce a scope especially for marine use (NONM4X-MR Marine Night Vision Scope) if you really want to make sure that you can use your device in the wettest of conditions.
Night Owl Optics are a little cagey in describing exactly how their iGen Night Vision Viewer works, but apart from some of their specific "image processing techniques" and "special optics," I would imagine that the core technology works pretty much the same as on most digital night vision devices, they just take it to a whole new level.
Basically any available light is collected as normal through the objective lens, but instead of converting the energy into electrons as with normal night vision, this optical image is converted into an electric signal through a highly sensitive Charge-Coupled Device or more commonly known as a CCD image sensor, similar to what is found in most digital cameras and other imaging devices these days.
This signal is then displayed onto a micro display LCD screen, which you look at through the eye-piece. That's the basics of it, if you want to learn more, take a look at my article on how digital night vision works.
Width of the View
Night Owl Optics advertise the angle of view as being 12° and the Field of View as 70 ft. wide at a distance of 330 ft.
Close Focus
The nearest the iGen can focus on an object is 16 feet (4.9 meters) away.
Up until very recently most of the expert opinions suggested that digital night vision devices were about as good as the early standard Gen-1 devices, but were outperformed by the newer higher quality Gen-1 devices and they lagged quite a bit behind Generation-2 and Gen-3 devices.
However things move on and technologies improve and in their marketing Night Vision Optics are confident in their declaration that that their iGen 20/20 will outperform Gen-2 and even compares with some Generation-3 devices and all at a fraction of the cost.
So is this just marketing hype or are they really as good as they say they are?
Well, at the time of testing and then writing this review I had quite recently finished with the excellent high grade Gen2+ Luna Optics LN-EM1-MS Night Vision Monoculars which was still fresh in my mind and I had taken a whole bunch of photos through it for the review to compare with.
I also had two other Night Owl Gen1 devices with me to compare these against, the NOB5X Night vision binoculars and the NOXM42AL Monoculars.
Black & White is the New Green
Firstly it was actually quite strange at first to turn the iGen on and view an image at night in black and white. It is almost as if I have trained my brain into believing that all night vision is tinted green!
Using the menu, you can actually change the color of the image on the screen to green or even blue or red. But once I was used to it, I thought that the black and white image is far superior to the other tints.
Incidentally, the reason you can change the tints is for more than just aesthetics - the rod cells in your eye, which are more sensitive and thus function better than your cone cells at night are most sensitive to green wavelengths of light and so you are supposed to be able to see more detail in a green image.
The red tint is designed to help you if you if you need to often look away from the viewer at night.
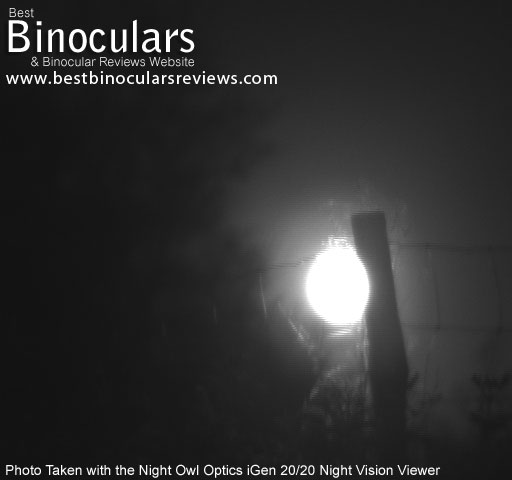
The iGen can amplify the ambient light up to a maximum of 10000 times, but it does not have to and that is one of the real benefits of this device.
Most normal intensifier tube NV devices, amplify the light to their maximum level and other than switching on or off the IR there is nothing else you can really do. So they can be very sensitive to bright lights and so because of this there are times when something like a street lamp or even the full moon, can prevent you from looking in a particular direction.
However with the iGen, there are actually a number of ways you can adjust the device to either be less sensitive or more depending on your needs and as you can see below, I even tool a photo of the full moon rising.
1) Gain Control
The first is to adjust the electronic gain using the three-way switch. The iGen has 10 different settings and you just push the button in either direction to make the image brighter or dimmer.
In very dark conditions and with the gain set to maximum, the image does become a little "noisy", but this is to be expected as the device is basically swapping image quality for maximum light amplification. Even so and as Night Owl point out: "it is preferable to se a lower resolution image than to see no image at all."
2) Exposure
The second way of adjusting the brightness and just how sensitive the iGen is to low light is to increase the exposure time.
If you understand photography, you will easily grasp how this works, but basically by taking a little more time to let more light into the unit before processing it into an image for you to look at, you effectively give the iGen more light and therefore more information to make the image even better.
The down side to really long exposures is the image can get quite jerky if you don't keep the unit very still.
As a default the iGen collects light for processing 30 times per second or to put it another way, the shutter remains open for 1/30th of a second or the exposure is 30 frames per second (fps).
This can be adjusted in the menu right down to just 2fps where the sensitivity to light is incredible, enabling you to see in very dark conditions even with the gain control set very low. But at the very low frame rates, you really do need to use something like a tripod to keep the image still to get the best results.
I found that I was still able to hand hold the device and get a good smooth image at about 15fps, anything lower than that and the jerky image gets progressively worse. However, it is just possible to hand hold it at 2fps, but you have to really concentrate on keeping very still, if you find need it at these low fps settings quite often then you should consider mounting the unit on a tripod.
3) Infrared Emitter
Whilst the
iGen works really well, even when there is very low amounts of ambient light, the built in IR lamp is designed to be used in totally dark conditions.
Depending at how dark it is and how close the objects you are looking at away from you, will dictate just how effective the IR is.
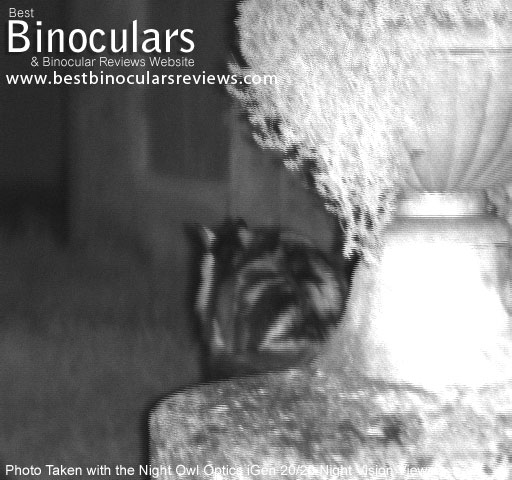
There are times that turning the IR on can make it harder to see what you are looking at or even completely over expose the image. But with a little practice you will soon work out when best to use it and how to get the best out of it. You can take a look at a few of my sample photos below for examples of how just how much it can light up a scene.
4) Adjusting the Brightness
You can also adjust the brightness of the screen. Whilst this does not change how sensitive the iGen is to light, you can change it to help you see the image that it is displaying on the screen better. Or turn it down to increase battery life and to help with image blindness when you look away from the eyepiece.
Comparing the image produced on the screen of the iGen with that of the two Generation 1 devices that I had with me (The Night Owl NOB5X Night vision binoculars and the Night Owl NOXM42AL Monoculars.) was actually quite difficult - mainly because they are all quite different. Each has their own strong and weak points and so it is hard to say that one is completely better than the other:
The first thing to note is that I conducted these comparisons on an overcast night, although there was a full moon, for much of the time it was hidden behind the clouds, so I would describe the available light as being average.
First I would say that both the NOB5X Binoculars and the iGen performed better than the NOXM42AL Monoculars. This is understandable as even though the binoculars have a massive 5x magnification (higher magnifications produce less bright images), you get two high-quality generation-1 image intensifier tubes as opposed to the one in the monocular.
The binoculars also have two 50mm objective lenses that can capture much more light than the one 42mm one on the scope.
Then between the binocular and the iGen it was very close.
Without the IR switched on, there were times when I thought that the binoculars gave you more detail when looking at really dark areas, like at the base of some bushes.
But then, by playing with the gain control and the exposure settings, you could work it so that you get to see even more with the iGen. The down side was that it took time to get the settings correct and because of the slow frame rate, you had to keep the iGen very still and only move the view around very slowly.
With the IR on, I would say both were about even, especially at short to medium distances, you really could not say one was much better than the other. At long distances, once again initially I preferred the binoculars, but with time and playing with the settings, you really could make the iGen see as much.
I would like to add that when it is very dark, to get a comparable view, the contrast of the image on the iGen had to be very high, whilst on the binoculars you got far more shades between light and dark.
Obviously with the iGen you don't get any of the blotches and unless you set the gain very high, less fuzziness as well. The image on the iGen is also sharp right to the edges, whilst on the binoculars, the monocular and most other NV devices I have used there is quite a bit of softening of the image at the edges of the view.
iGen vs Gen2+ Monoculars
Going from memory and taking a look at the images I took for the the Luna Optics LN-EM1-MS Review, always keeping in mind that the Luna Optics monocular only has a 26mm objective lens - I would probably say that their performance was about equal to that of the Night Owl NOB5X Binoculars and so all that I have written above remains true if I were to compare the iGen to the Gen2+ Luna Optics monocular.
To conclude, I think the most important thing to stress is that the iGen and it's digital night vision technology really can compete with very high end Generation 1 and is at least as good as the Gen 2+ device that I have used and possibly better in some areas, which is really impressive.
I can't comment on Gen 3 vs the iGen as I have not yet been lucky enough to use a Gen 3 product. But rather than agonising over the differences that really are very hard to make out, the important thing and the real strong point for me of the iGen over standard NV is that you can make so many adjustments and depending on your situation and what you are trying to do, you are able to get the best image possible.
This scope differs from standard night vision devices in that it still uses high quality optics to collect the light, but this light is then converted into a digital signal.
One of the best things about this is is that it enables you to digitally record this information in the form of still images and video.
This is one of the Major advantages the iGen has over almost all it's competition where the only way you can record on them is to find that accepts an adapter that allows you to attach your camera to the eyepiece.
Still Images
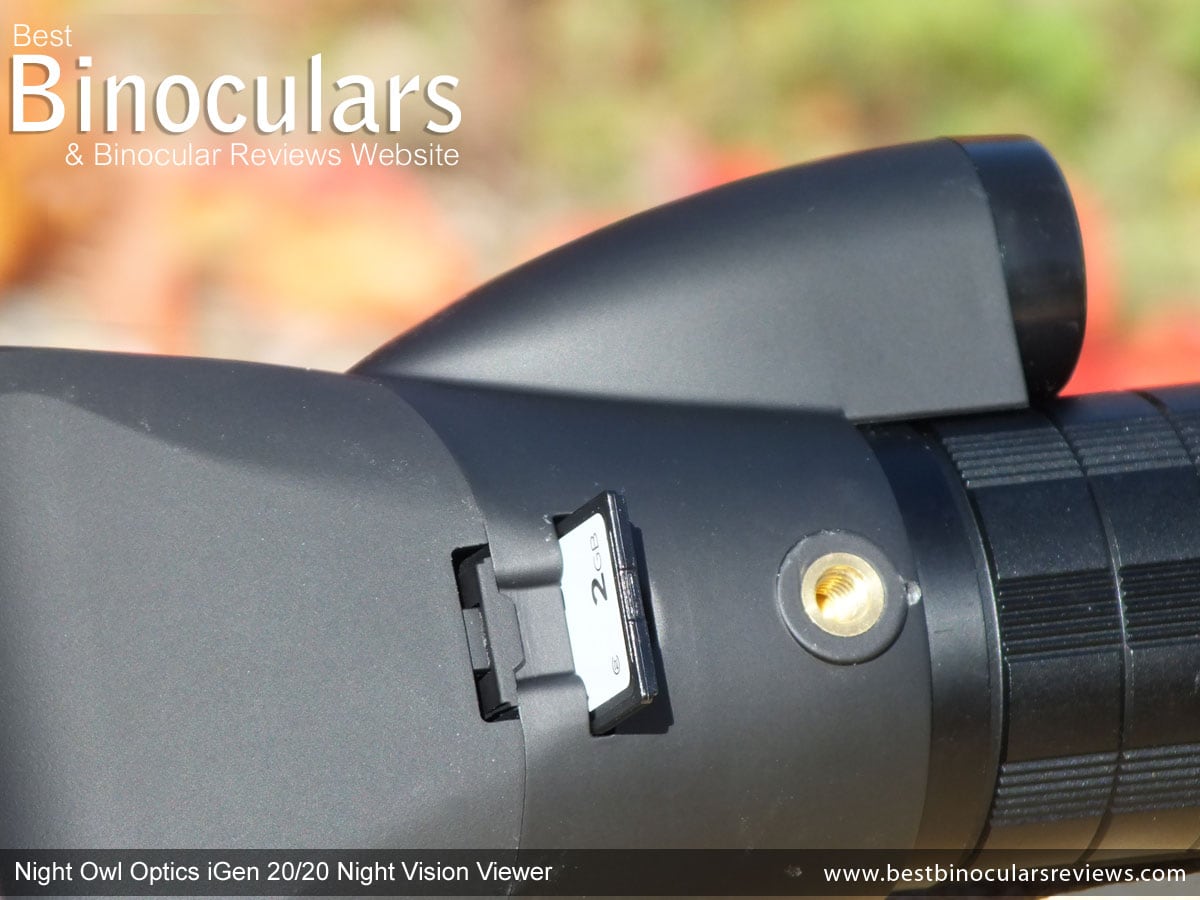 Black and white images are stored on a memory card (one of which is supplied with the unit) that slots into a opening on the underside of the iGen 20/20.
Taking photos is really simple, you first activate "image capture" by pressing and holding the second large button on the top of the unit (see Fig. 1), then you just press it again anytime you want to capture what you are looking at.
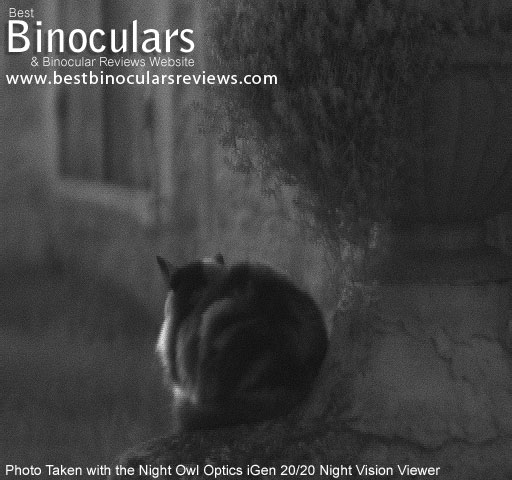
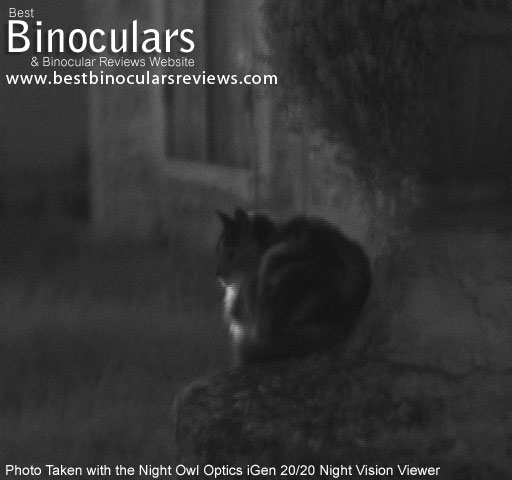
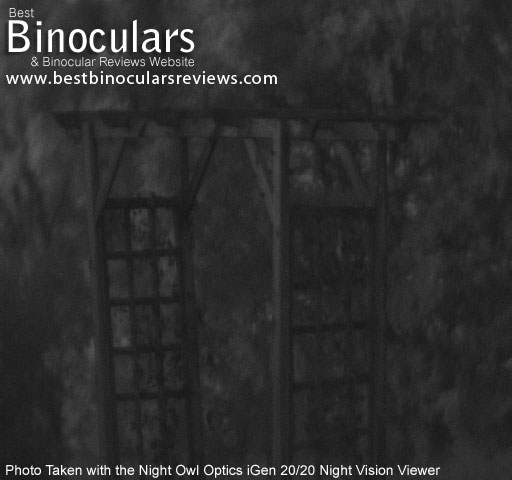
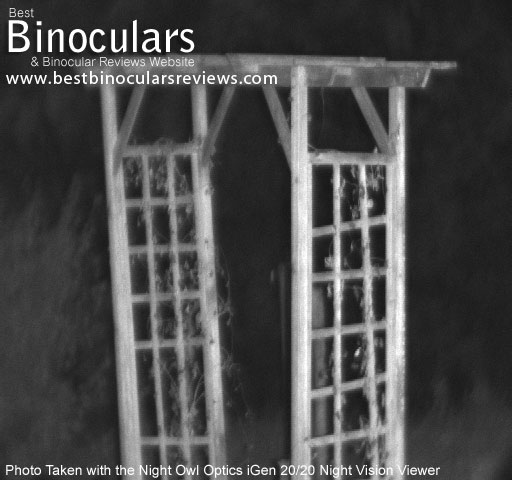
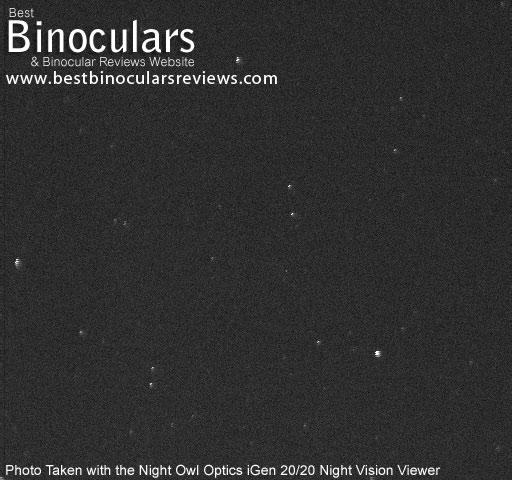
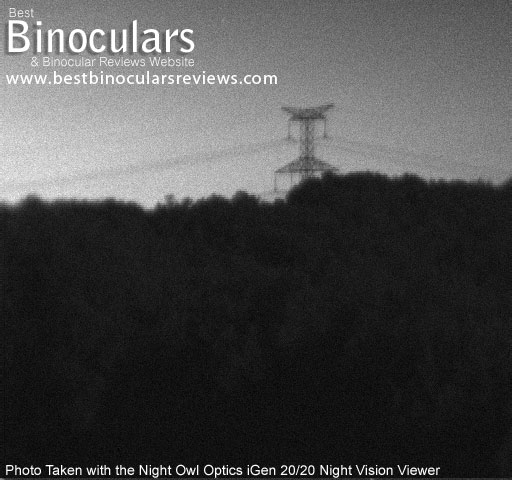
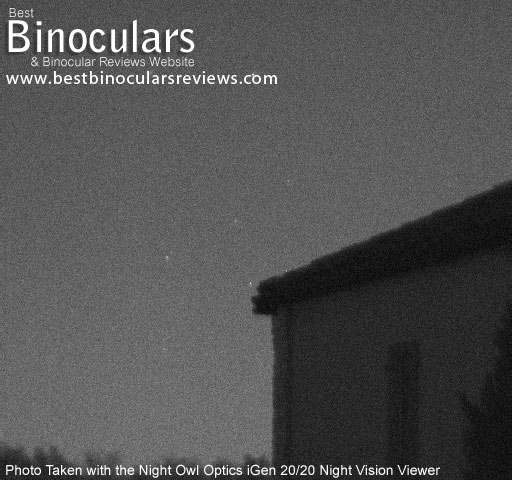
I took all the photos below using the iGen 20/20 on a clear night with a full moon, so there was plenty of ambient light available.
I have not done any editing of the images other than to add my logo to them. When you click for the full size version, that is the exact size (512x480 pixels) of image that gets taken and stored by the device. (It stores both .tiff and .jpg versions for you.)
Note that even if you change the viewing color in the settings, the camera will still take a black and white image.
Looking at how clearly you can see many of the objects in the photos below, it may be really hard for you to believe that without the device you really could not see much at all, but it is true.
Recording Video
 Recording video is not quite as straight forward as still images, however it is not that hard to set up and from some of the examples that I have found on the web, the results are really impressive.
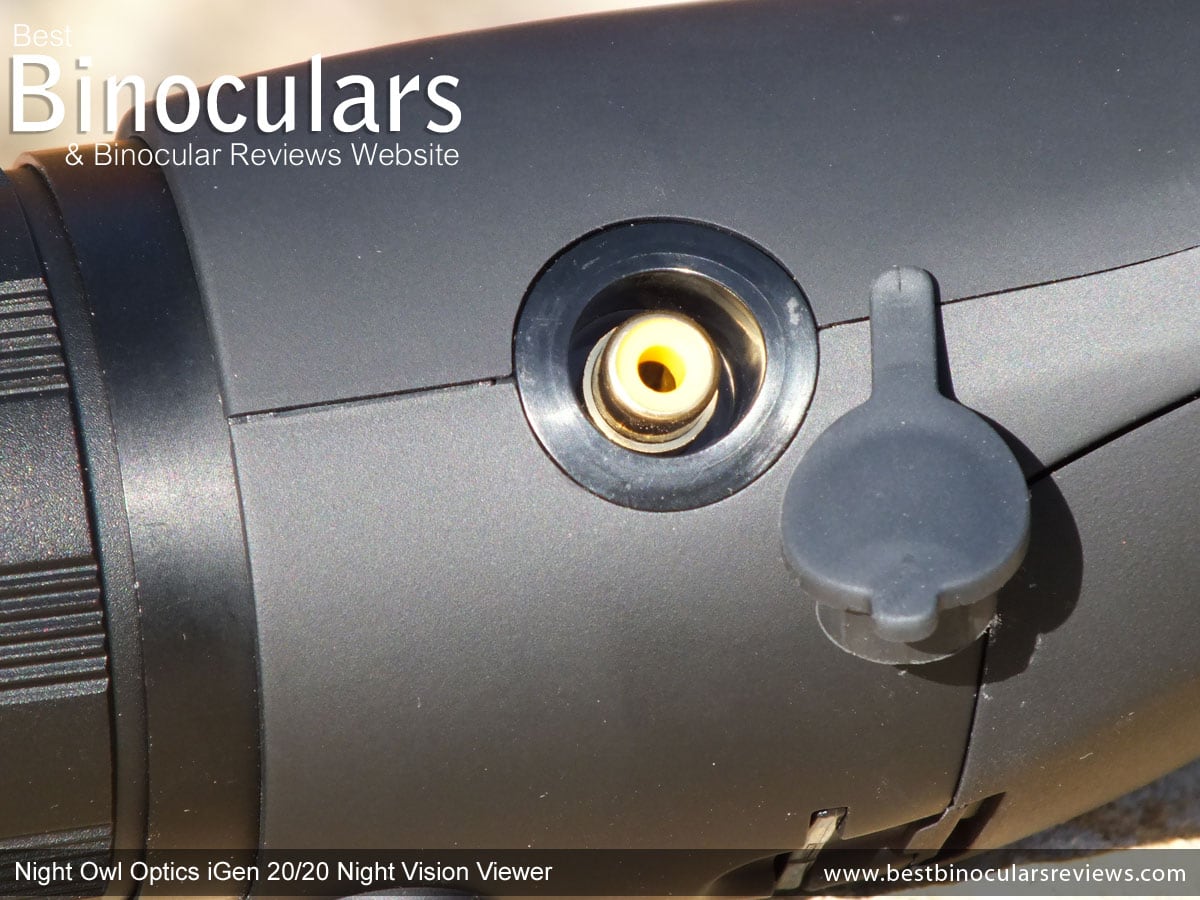
The iGen comes with a Video Composite Output port located under a cover on the left side of the unit, which you can then connect an external recording device to the iGen using a standard video cable (RCA cable) which is not included.
This means that you can record onto anything that has an input option to record video - this includes being able to record directly to your Laptop, PC or Mac.
From the research I have done a good option seems to be to record to a handheld camcorder. Look out for the Aiptek camcorders that accepts composite video in.
The example video below was recorded using an old EYE TV A/V to firewire converter running in to a Macbook Pro. Whilst the video may not look great in the beginning, stay with it as it does show off some of the best features of the iGen 20/20:
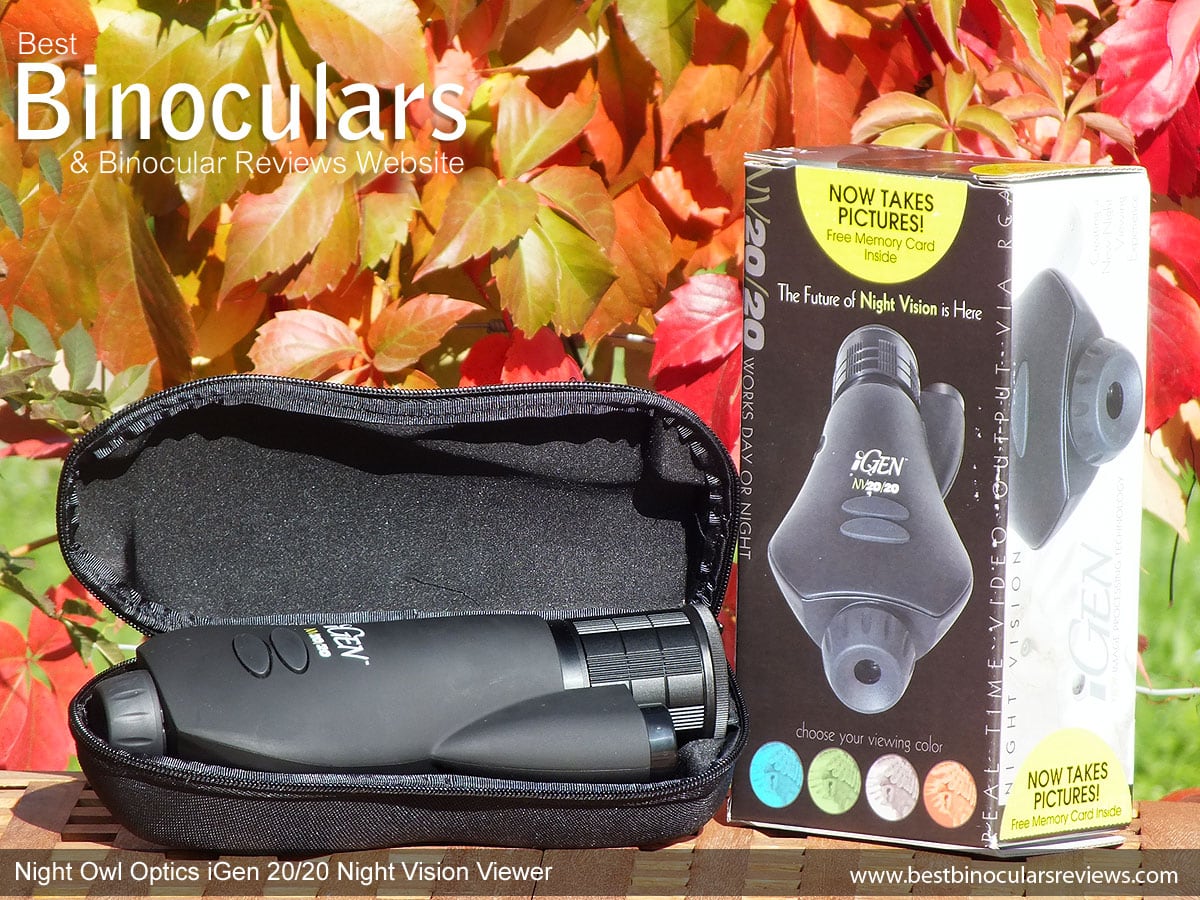
Storage Case
Rather than the typical carry case, the iGen 20/20 comes with a semi-hard storage case. It is moulded to fit the shape of the unit, which fits in very snugly. This gives the iGen plenty of protection and should keep it safe from most minor accidents.
Memory Card
Also included is a standard Flash memory card, my came with 2GB of storage space.
Manual & Warranty
The manual that comes with the device is comprehensive and covers pretty much everything you need to know and in some detail which is quite a change from many products I test.
At the back of the manual are the details of the 1-Year Limited Warranty, which basically states that the iGenIC is warranted against defects in materials and workmanship under normal use for 1 year. Damage cause by neglect, misuse etc is not covered.
Tripod Mountable
Under the unit is a built-in tripod fitting that uses the standard 1/4 inch threading to fit almost all tripod mounts.
Mounting the iGen onto a tripod will really help if you use longer exposures by keeping it completely still.
I was actually a little sceptical before trying out the iGen 20/20, but now that I have, I am a real convert. The quality of the image that it produces, even in very dark conditions is excellent and it comes without all the blemishes that you get with traditional night vision and it is sharp right to the edges of the view - this is really impressive.
I also love the fact that with a couple of clicks you can take an image of what ever you are looking at, which is a HUGE advantage the iGenIC has over almost all it's competition.
The shape of the iGen is somewhat unique, but it really works. It is very comfortable to hold up to your face and permits you to change all the settings and adjust focus without having to take your eyes away from the eyepiece.
Weak Areas: I guess when compared to some of the really small monoculars that I have used in the past, the iGen is a little bulky. However the fact that it is so comfortable to hold quickly put this to the back of my mind. Also remember that a smaller objective lens would mean less light being gathered and therefor reduced performance.
Whilst it is really easy to set up the iGenIC to record video, it would have been really great if it would just record straight to the memory card.
I was also a little surprised that there is no neck or hand strap on the device. This little bit of added security from dropping can be important, especially when stumbling around at night.
Final Thoughts
Overall I was very impressed especially as it does actually do what it says on the box - competes with and yes even possibly beats some Gen 1 and Gen 2 devices.
However, being able to record images and video and the fact that you can adjust so many settings to get the best possible image for such a wide variety of situations are what really sets the iGenIC 20/20 Night Vision Viewer apart from traditional NV devices for me.
Reviewed by Jason Whitehead for Best Binocular Reviews
|
Awards:Main Specifications & Features:
Below are similar pairs of Night Vision Monoculars that you may also want to have a look at:
Lightweight and very compact Gen2+ night vision monocular that produces very high quality and bright images even in complete darkness
General Price Range: (5/6) High Value Night Vision Monoculars
Below is a link that will take you to a page with online retailers in both the US and UK that sell Night Owl Optics 2.6x39 iGen Night Vision Monoculars this page makes it easy to compare prices and then to buy from your preferred option:
|
Buy & Compare Prices for the Night Owl Optics 2.6x39 iGen Night Vision Monoculars |
||
US Shoppers |
Canadian Shoppers |
UK Shoppers |
Deutsch Shoppers |
Aussie Shoppers |
Indian Shoppers |