
Binocular Reviews Home > Hunting Guides > Cheap Thermal Monoculars for Hunting
Like many night vision devices especially digital ones, the technology in thermal imaging devices like binoculars, scopes, goggles and monoculars has really advanced over the last few years.
So what was up until quite recently only available to the military and law enforcement sectors is now not only available for civilians, but is becoming much more affordable as the technology spreads and more and more competition comes into the marketplace.
It was only a shot time ago that you would have no option but to spend thousands of dollars on a thermal imaging device and so whilst I will agree that to most people, anything around the $600 mark would not be considered inexpensive, but if you are serious about purchasing a thermal imaging device, this amount is not astronomical either and I believe if you choose wisely (see advice & recommendations below), you can get a surprisingly good level of performance at this level:
All objects with a temperature of more than absolute zero emit thermal infrared energy and so in a nutshell these monoculars have detectors inside them are able to convert the energy contained in the infrared wavelength into a visible light display and thus are able to "see" all objects, regardless of the level of visible ambient light. For more details: How Thermal Imaging Works.
1) Resolution
One of the most important aspects to take-away from how thermal imaging works is that each pixel you see in the view requires a separate detector (microbolometer) and thus it is understandable that in order to keep the price down, less expensive thermal imaging devices will use less of these in the array and thus will have a lower resolution than higher-end devices.
2) Monocular vs Binocular
Another way to keep the cost of the thermal imaging device down is to essentially cut it in half. So whilst a thermal binocular
will be able to capture twice as much thermal radiation as a monocular, it will also cost substantially more to make. The advantage a monocular has however is that it is far more lightweight and compact. For more: Best Thermal Binoculars ($3000+)
So based on this, below are a couple of the best thermal monoculars costing under $600 currently on the market:
Currently costing about $495, this AGM thermal monocular is in many ways is very similar to the more expensive FLIR Scout TK below, yet it blew me away during testing and for me was a real game changer which you can read more about in my full review.
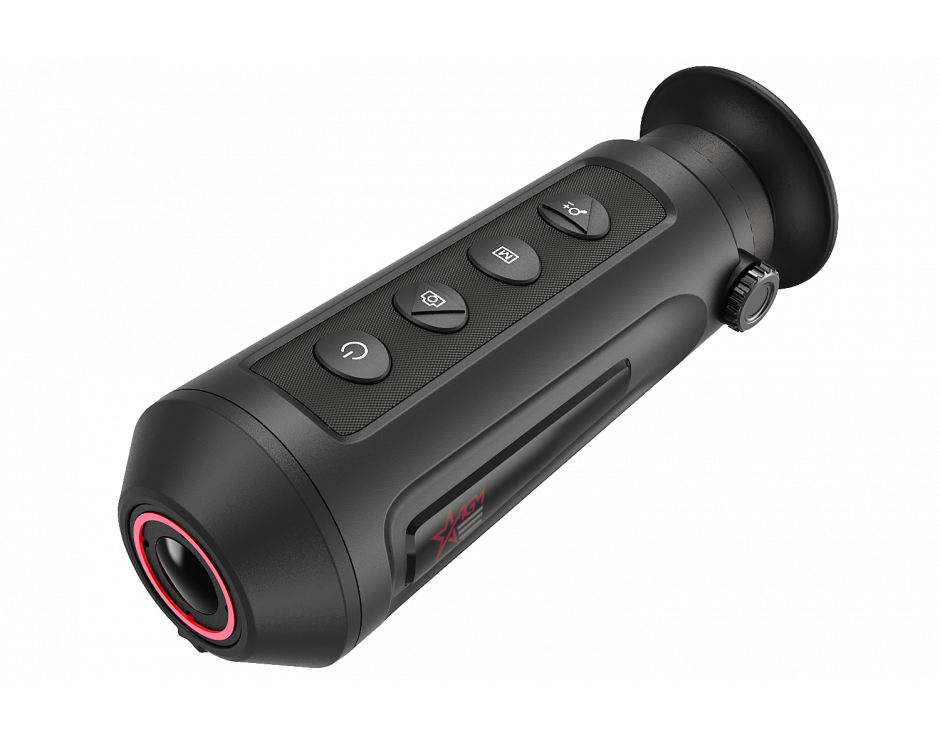
The ease of use, build quality, and the performance are seriously impressive for such a small thermal imager at this price level. Below are some of the main technical details as well as my initial unboxing video that also includes some examples of the first video footage that I captured the first time I used the device. For more, better samples, be sure to take a look at the full review.
| Built-In Display: | 720 x 540, 0.2inch LCOS |
| Detector: | VOx un-cooled Focal Plane Arrays |
| Resolution: | 160 x 120 |
| Angle of View (HxV) | 15.6°x11.7° |
| Zoom: | 1x (optical) 2x, 4x (digital) |
| Start-up Time: | approx 5 seconds |
| Waveband | 8 - 14 μm |
| Video Refresh Rate: | 50Hz |
| Recording: | Image (720x576px) & Video (MP4 720x576, 25fps) |
| Storage: | 8 GB (built-in) |
| Connection | USB & Wi-Fi Hotspot |
| Battery Type | Internal Li-Ion Cell |
| Waterproof | Yes: IP-67, Submersible (1m for 30min) |
The AGM Asp-Micro TM160 Thermal Imaging Monocular currently retails for around $495, which as I say, considering the performance that I have achieved whilst using it thus far, looks to me to be really great value for money and certainly makes it one of, if not the best value thermal monoculars currently on the market:
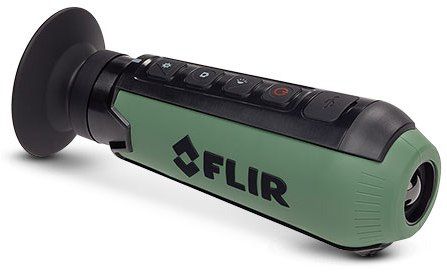
Whilst not the cheapest option, the FLIR Scout TK is certainly on of the most popular thermal monoculars for hunting currently on the market and yet despite the number of quality components, it still manages to come in under $600:
As I am sure you already know, for hunting at night, thermal imaging is in many ways superior to standard night vision as it picks up and highlights body heat, which makes spotting your game so much easier.
A really small and compact thermal imaging monocular, the TK Scout from FLIR is their entry level offering, but one that shares many features as that of their and other much more expensive devices:
Unlike most optical devices, another real advantage of thermal imaging is that you can "see through" smoke and fog, but I think one of the most important aspects to consider, especially in relation to the type of hunting you do is the range:
According to FLIR, the Scout TK has a detectable range of 100 yards (91m), which is good.
However, keep in mid that if you need to identify an animals horns for example, the actual distance may be a little nearer as just like standard NV, it also depends on a number of environmental factors.
As well as having a tough rubber armor that is similar to that you will find on your hunting binoculars.
The TK Scout has a IP-67 waterproof rating. This means that it is rated as being impervious to water at a depth of 1 meter for 30 minutes.
So whilst I wouldn't suggest you go swimming with it, it will be fine even in the worst weather conditions.
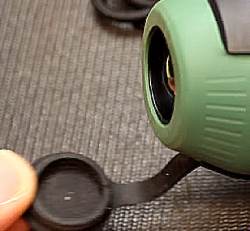 At the front of the device is rubber lens cover that is tethered to the instrument. Which is ideal, because looking for a lens cap that you dropped on the floor is the last thing you want to be doing in complete darkness!
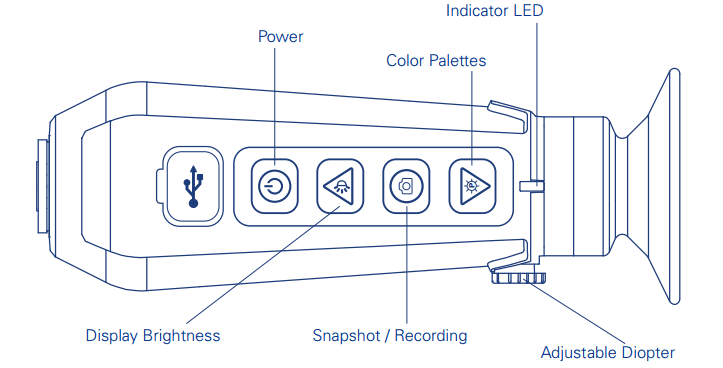
At the rear is a soft rubber eyecup and near the eye-piece is the small diopter adjuster that enables you to set the image to the correct distance to the viewfinder so as to get the sharpest view possible.
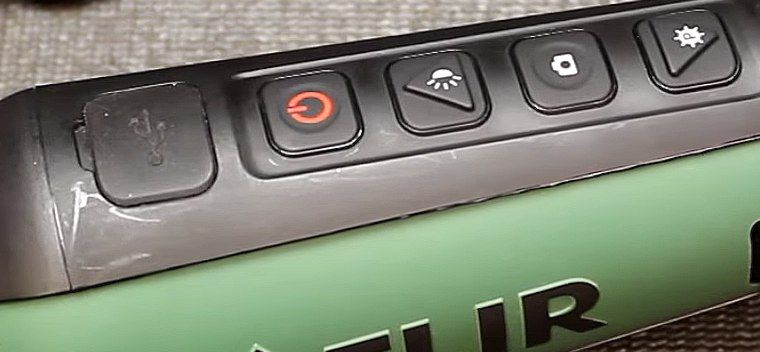
On the top of the device are the main buttons as well as the USB port.
This port is where you plug in the cable to charge the internal Li-Ion battery that lasts for around 5 hours of use.
You also use the included USB cable to access any of the images and video that you may have recorded and which are stored on the camera's internal storage.
I have not yet been able to establish exactly how much storage there is, but I think it is just under 2GB. Whatever the case, FLIR say that it is good for about 1000 images or up tto4 hours of video footage.
From left to right you have the USB port, Power button, image brightness, camera / video recording, color palette selector:
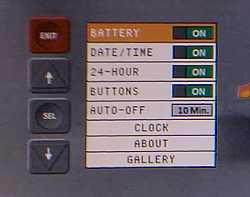 Menu
Menu
Pressing any of these buttons activates the menu that you can see on the LCD screen in the view finder.
It is pretty self explanatory and really simple to navigate.
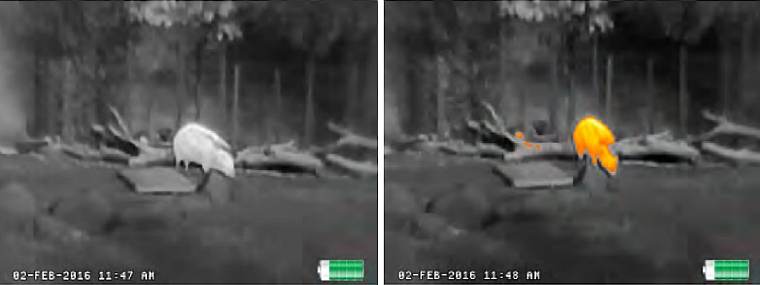
Color Palettes
The FLIR TK Scout Thermal Monocular comes with an impressive 9 different color palettes that are used to highlight the image in different ways depending on the conditions and what you are hunting for or looking at.
So by simply pressing the button you can access that section of the menu to change the colors that are applied to the image.
Below are two examples that are commonly used for hunting larger game, "White Hot" on the left where the warmest objects are white and is good for when there is low or high contrast between the target and the background. On the right is what FLIR calls "Graded Fire 1" and is where the warmest objects are colored very brightly against a grey background.
The video below was captured using the Scout TK, whilst very short, I think it gives you a good understanding of the sort of quality you can expect:
| Built-In Display: | 640 x 480 LCD |
| Detector: | 160 x 120 VOx Microbolometer |
| Angle of View (HxV) | 20°x16° |
| Start-up Time: | approx 5 seconds |
| Waveband | 7.5 - 13.5 μm |
| Video Refresh Rate: | <9Hz |
| Median Download | Micro USB |
| Battery Type | Internal Li-Ion Cell |
| Waterproof | Yes: IP-67, Submersible (1m for 30min) |
A the time of writing the FLIR Scout TK has a retail price of $599, which to me looks to be really great value for money and no doubt the best thermal monocular for hunting currently on the market:
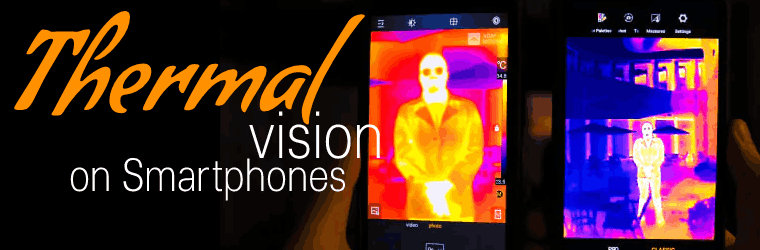
 Another option we worth cosidering is to get a thermal imager that is either designed to attach to or come integrated into your next smartphone:
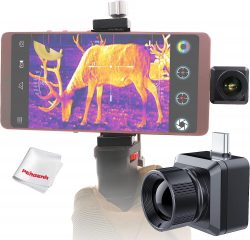
Costing about the same as the AGM Asp Micro, the InfiRay Xinfrared T2 Pro Thermal Eye consists of a separate thermal camera, an adapter and the necessary cable to connect it with your phone. You then use their App on your phone to display and record the thermal images it collects.
Another option is to get a dedicated smartphone that has an integrated thermal camera.
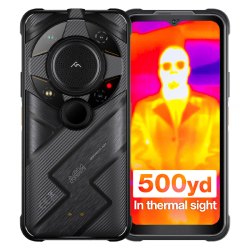 The AGM G2 Guardian (pictured right) is a great example as it offers several advantages over a thermal camera attachment for your phone or a dedicated monocular:
Convenience: A dedicated smartphone with integrated thermal imaging is certainly more convenient to use as it eliminates the need for a separate thermal camera attachment or monocular that you will also need to carry about.
Always with you. You don't need to remember to bring the monocular or adapter and separate camera along with you and as most people will usually carry their phone wherever they go, an integrated option is always there ready to use and record with.
Improved Integration: An integrated thermal camera is designed to work with the smartphone's hardware and software, which often results in a better overall user experience.
More Portable. A dedicated smartphone with an integrated thermal camera is usually less bulky, smaller and lighter than a separate thermal camera attachment on your phone, making it more portable and easier to handle.
Sharing: As it is part of you phone, it makes sharing your thermal images and video much easier, no more having to transfer to your other device first.
More Details: Full Review of the AGM G2 Guardian Smartphone