How Binoculars Work
 Article | Posted by Best Binocular Reviews
 Whilst you don’t need to become an expert, I always find that I am able to get the most out of something if I have at least a basic understanding of how it functions.
So how do binoculars work?
In this comprehensive guide, I will go over the science behind how the optics in a pair of binoculars are able to collect light and then present you with a magnified image of the view in front of you. In future articles, I also plan to go over the main mechanics behind how the focus and eye-cup mechanisms work and the range of different options available.
In this way, I am certain that by the end of it you will understand how binoculars work and thus be far better prepared when choosing the right instrument for your needs and then once it arrives,
Two Telescopes
At it’s simplest form, a set of binoculars is essentially made up of two telescopes placed side-by-side. So to start with and to make things a little simpler, let us cut our binocular in half and first learn how a telescope works and then we will put them back together at the end:
Lenses, Light & Refraction
Fundamentally how binoculars work and magnify a view is by using lenses that causes light to do something known as refraction:
Through the vacuum of space, light travels in a straight line, but as it passes through different materials it changes speed.
So as light passes through a thick medium like glass or water, it slows down. This generally causes the light waves to bend and it is this bending of light that is called refraction. Light refraction is what causes a straw to look like it is bent when it is in a glass of water. it also has many useful purposes and is the key being able to magnify what you are looking at.
Lenses
Rather than just using a simple flat sheet or block of glass, instruments like telescopes, binoculars and even reading glasses use specially shaped glass lenses that are often made up from a number of individual lens elements that better able to control the bending of the light waves.
The objective lens (the one closest to the object you are looking at) on a binocular is Convex in shape, meaning that the centre of it is thicker than the outside. Known as a converging lens, it catches the light from a distant object and then through refraction, it causes the light to bend and come together (converge) as it passes through the glass. the lightwaves then focus at a point behind the lens.
The eyepiece lens then takes this focused light and magnifies it, where it then passes on an into your eyes.
Magnification
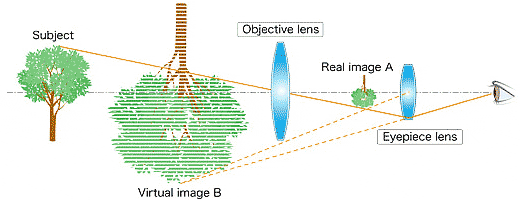
The diagram above shows us in principle how the image gets magnified:
Firstly the light travels from the subject and a real image A is produced by the objective lens. This image is then magnified by an eyepiece lens and is viewed as a virtual image B. The result is that magnified objects look as if they were in front of you and nearer than the subject.
6x, 7x, 8, 10x, or more.
The amount the image gets magnified is determined by the ratio of the focal length of the objective lens divided by the focal length of the eyepiece lens.
So a magnification factor of 8, for example, will produce a virtual image that looks 8 times larger than the subject.
How much magnification you need depends on the intended use and it is often a mistake to assume that the higher the power, the better the binocular as higher magnifications also bring about many disadvantages. For more take a look at this article: Magnification, Stability, Field of View & Brightness
As you can also see in the diagram above, the virtual image is inverted. Below we will take a look at why this happens and how it gets rectified:
Upside-down Image
This is great and the story can end here if you are simply making a telescope for uses like astronomy.
In fact, you can quite easily make a simple telescope by taking two lenses and separating them with a closed tube. Indeed this is pretty much how the first ever telescope was created.
However, what you will notice when looking through it is that the image that you see will be turned upside-down and mirrored. This is because a convex lens causes the light to cross over as it converges.
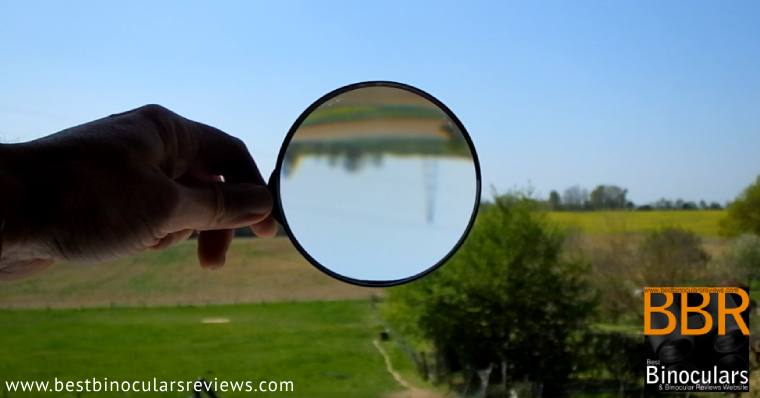
In fact you can very easily demonstrate this if you hold a magnifying glass out at about arms length and look at some distant objects through it. You will see that the image will be upside-down and reverse mirrored.
For looking at distant stars, this is not really a problem and indeed many astronomy telescopes produce a non-rectified image, but for terrestrial uses, this is a problem. Luckily there are a few solutions:
Image Correction
For binoculars and most terrestrial telescopes (spotting scopes) there are two main ways of doing this, by using a concave lens for the eyepiece or an image erecting prisms:
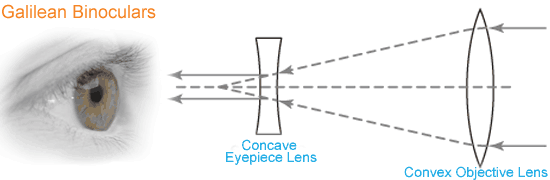
Galilean Optics
Used in telescopes invented Galileo Galilei in the 17th Century, Galilean Optics use a convex objective lens in the normal way, but change this to a concave lens system for the eyepiece.
Also known as a diverging lens, the concave lens makes light rays spread apart (diverge). So if positioned at the correct distance from the convex objective lens, it can prevent the light from crossing over and thus stop the image from becoming inverted.
Low cost and easy to make, this system is still used on Opera & Theatre Binoculars to this day.
However the downsides are that it is hard to obtain a high magnification, you get a fairly narrow field of view and you get a high level of image blurring on the edges of the image.
It is for these reasons that for most uses a prism system is seen as a better alternative:
Keplerian Optics with Prisms
Unlike Galilean Optics that use a concave lens in the eyepiece, the Keplerian optical system uses convex lenses for the objectives as well as eyepiece lenses and is generally considered an improvement on Galileo’s design.
However the image still needs to be corrected and this achieved with the use of a prism:
Correct The Inverted Image
Working like a mirror, most modern binoculars use erecting prisms that reflect the light and thus alter the orientation, correcting the image.
Whilst a standard mirror is perfect for looking at yourself in the morning, in a binocular it would be no good if the light was simply reflected 180° and back to where it came from as you would then never be able to see the image.
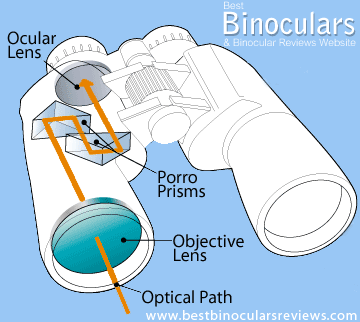
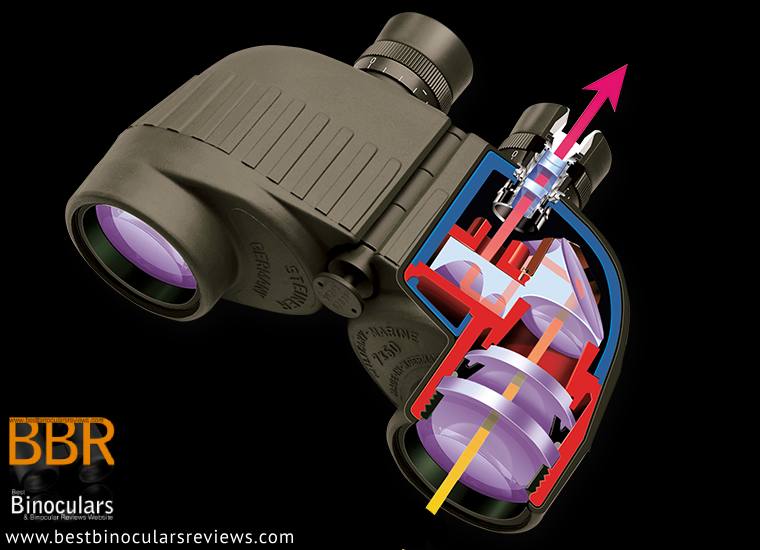
Porro Prisms
This problem was first solved by using a pair of Porro prisms. Named after the Italian inventor Ignazio Porro, a single Porro prism, like a mirror also reflects light 180° and back in the direction it came from, but it does it parallel to the incident light and not directly along the same path.
So this really helps because it allows you to place two of these Porro prisms at right angles to each other, which in turn means you can then reflect the light so that it not only re-orients the inverted image but also effectively allows it to continue in the same direction and towards the eyepieces.
Indeed it is these two Porro prisms placed at right angles that give binoculars their traditional, iconic shape and which is why their eyepieces are closer together than the objective lenses.

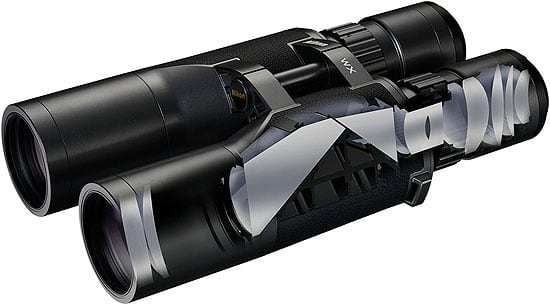
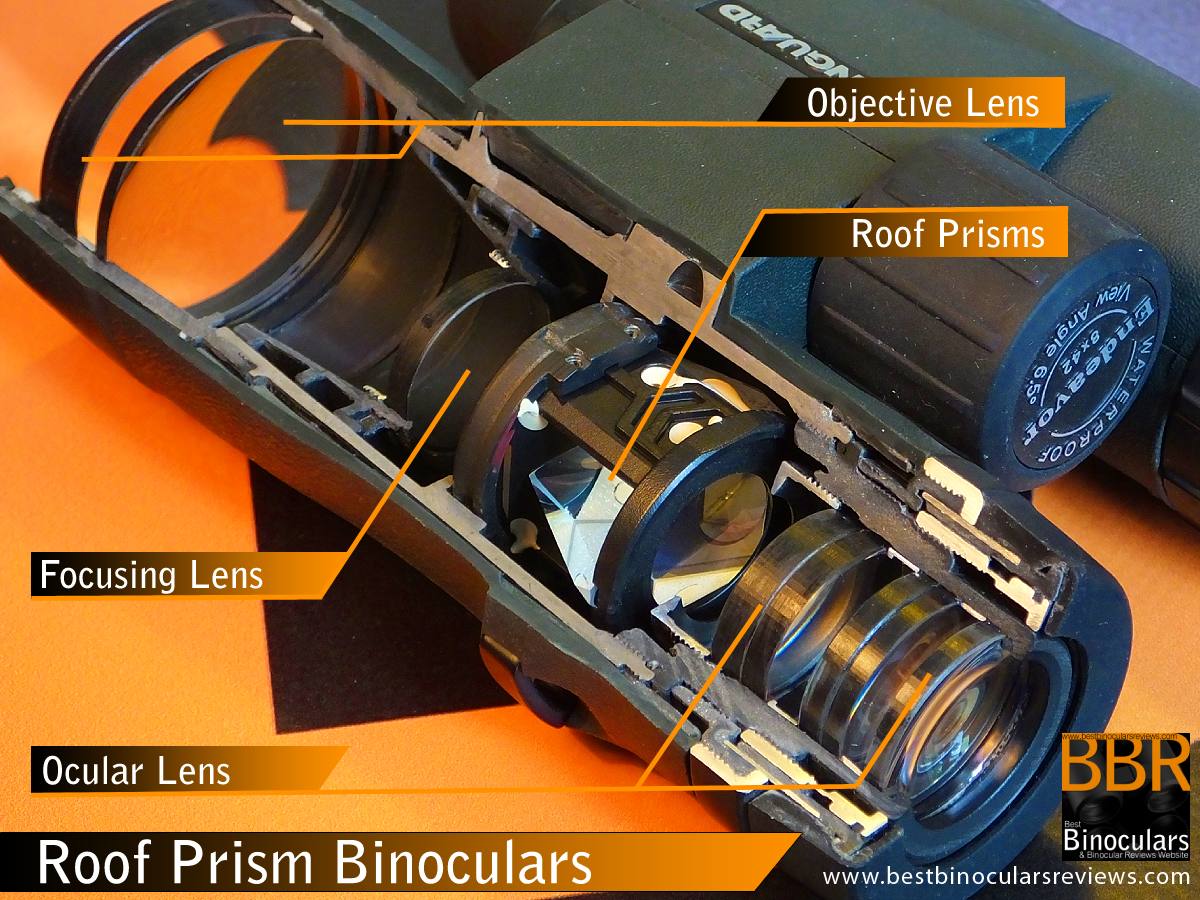
Roof Prisms
As well as the Porro prism, there are a number of other designs that each have their own unique advantages.
Two of them, the Abbe-Koenig prism and the Schmidt-Pechan prism are types of roof prisms that are now commonly used in binoculars.
Of these, the Schmidt-Pechan prism is most common because it allows manufacturers to produce a more compact, slimmer binocular with the eyepieces in-line with the objectives. The downside is that they require a number of special coatings to achieve total internal reflection and eliminate a phenomenon known as phase shifting.
Why Binoculars Are Shorter than Telescopes
The second benefit to using prisms is that because the light is reversed twice as it goes through the prism and so goes back on itself, the distance that it travels in that space is increased.
Therefore, the overall length of the binocular can be shortened as the required distance between the objective lenses and the eyepiece is also reduced and this is why binoculars are shorter than refracting telescopes with the same magnification as they lack a prism.
Further Reading
- Steiner Factory Tour – an insight and behind the scenes look as to how Steiner Binoculars are made.
- How Binoculars are Made
- Binoculars: FAQ
- What do Binocular Numbers Mean?
- How to Use Binoculars

 Categories: Technical |
  Tags: |
  No Comments »